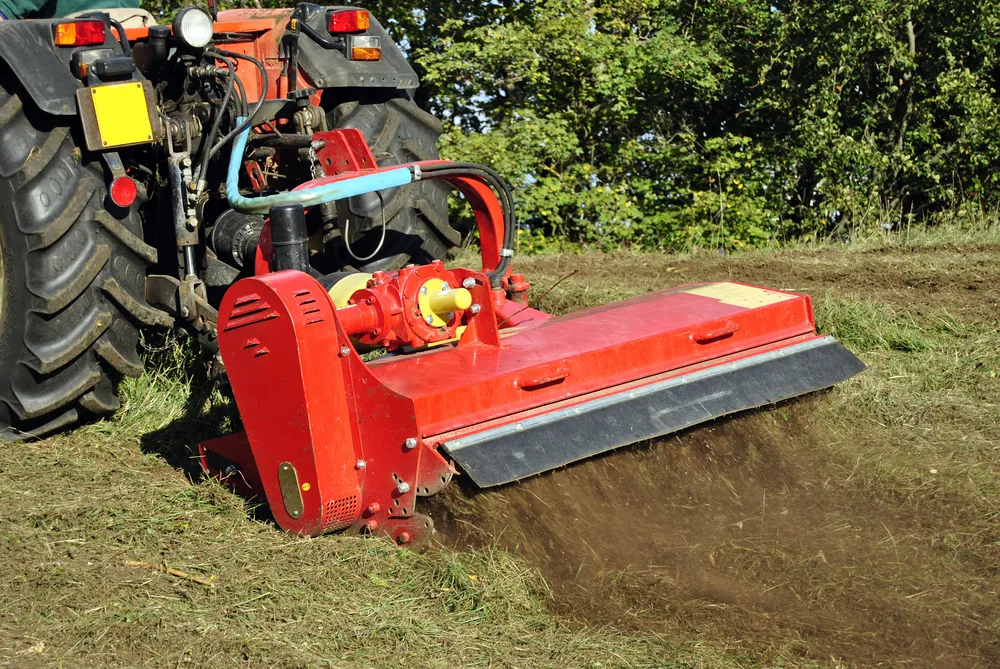
Bush Hog equipment, known for its durability and performance in agricultural and landscaping tasks, relies heavily on the efficiency of its caja de cambios. This vital component transmits power from the tractor to the machine, enabling it to perform its functions. However, like all mechanical parts, a gearbox is subject to wear and tear over time, necessitating regular maintenance and, eventually, a rebuild. This article explores the Bush Hog gearbox rebuild kit, detailing the components, when and why a rebuild is necessary, and how to successfully complete one.
Understanding Gearbox Wear and Failure
The gearbox is the heart of your Bush Hog's operational efficiency, but it's not immune to problems. Wear and failure can manifest as grinding noises, difficulty in shifting, or even complete operational failure. Contributing factors include inadequate lubrication, overloading the equipment, and general wear and tear over time. Recognizing these signs early can save you from more extensive and costly repairs down the line.
The Components of a Bush Hog Gearbox Rebuild Kit
A typical Bush Hog gearbox rebuild kit includes bearings, seals, gaskets, and possibly gears or shafts if they are commonly known to wear in your particular model. Each component has a specific role: bearings reduce friction between moving parts, seals prevent fluid leaks, gaskets ensure tight seals between separate metal parts, and gears and shafts transmit power within the gearbox.
When to Consider a Gearbox Rebuild
Deciding to repair, rebuild, or replace your Bush Hog's gearbox depends on several factors, including the extent of the damage, the cost of replacement parts, and the age and condition of the equipment. A rebuild is often the most cost-effective solution for extending the life of your equipment without the expense of a full replacement.
Preparing for a Gearbox Rebuild
A successful rebuild starts with proper preparation. Gather all necessary tools and ensure you have a clean, well-lit, and spacious workspace. Safety should be your top priority, so wear appropriate protective engranaje and follow all recommended safety practices.
Safety precaution
Ensure the gearbox and its sub-assemblies are firmly clamped or adequately supported to mitigate the risk of hand and foot injuries resulting from accidental dropping or tipping over. Prioritize safety by consistently wearing protective eyewear and gloves to shield against potential eye and hand injuries when working with metal components using chisels or hammers, as hardened metal may unexpectedly chip. Given the considerable weight of an assembled gearbox, exercise caution and employ proper lifting techniques. Utilize a hoist or enlist assistance to handle them securely, lifting with care and employing the strength of your legs rather than your back.
Tools Needed
Set of Snap Ring pliers
Needle nose pliers
Scrapper
Seal removal tool or flat head screwdriver
Ratchet or Air Ratchet with extension
5/8 socket and a 1 7/16 socket
Punch
Hammer
Seal Installation Tool
1/4 Allen wrench
Assembly Instructions:
- Ensure that the output shaft bearing pre-load measures between 6 to 8 inch-pounds without the seal (rolling torque).
- Adjust the gearbox backlash to a range of 6 to 8 thousandths.
- Inspect all components for damage and replace any parts that show signs of wear or damage.
- Exercise caution when assembling bearings to avoid exerting pressure on the rollers or cages, which could lead to damage.
- When installing oil seals, be mindful to avoid contact with cutting parts to prevent any damage to the inner lip of the seal.
- To add oil, remove the dipstick (item #26) and fill the gearbox with EP80W-90 gear oil up to the fill line indicated on the dipstick.
- For oil drainage, remove the plug (item #8) using a 1/4 Allen head wrench.
Step-by-Step Guide to Rebuilding a Bush Hog Gearbox
- Desmontaje: Carefully disassemble the gearbox, taking note of the placement and orientation of each component. This is crucial for successful reassembly.
- Inspección: Inspect each component for wear or damage. This will help you determine which parts need replacing.
- Cleaning: Thoroughly clean all parts to remove any debris or old lubricant.

- Replacement: Replace worn or damaged components with the new parts from your rebuild kit.
- Reassembly: Carefully reassemble the gearbox, ensuring all components are correctly aligned and torqued to specification.
- Lubricación: Refill the gearbox with the recommended type and amount of lubricant.

After the Rebuild: Testing and Maintenance
After reassembling the gearbox, it's important to test it under normal operating conditions to ensure everything is working correctly. Going forward, adhere to a regular maintenance schedule, including periodic lubrication and inspection, to extend the life of your rebuild and prevent future issues.
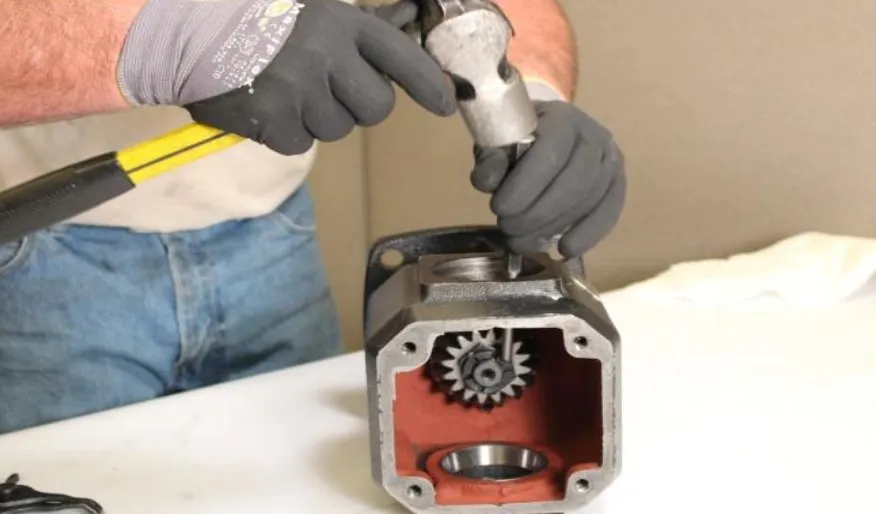
Disassembling Gearbox

Note: Before beginning disassembly, ensure the gearbox is completely drained of oil. Remove the bottom plug (Item #8) using a 1/4 Allen wrench.
- Remove Top Plate:
-
- Use a 5/8 socket or wrench to remove the four bolts (Item #6) and take off the top plate (Item #2).

2. Remove Input Seal:
-
- Utilize a seal removal tool or a flathead screwdriver to remove the input seal (Item #4).
3. Remove Gripping Cap:
-
- Employ a seal removal tool or a flathead screwdriver to remove the gripping cap (Item #5).

4. Remove Snap Ring and Shims (Front):
-
- Take off the snap ring (Item #16) from the front side of the input shaft and the shims (Item #12). Keep the shims and snap ring together, labeling them to ensure they can be reinstalled in the same location. Refer to the picture below for guidance on labeling the shims as GS (Gear Side).
5. Remove Snap Ring and Shims (Rear):
-
- Remove the snap ring (Item #16) and the shims (Item #12) from the rear side of the input shaft. Label and keep them together for reinstallation.

6. Remove Input Shaft:
-
- Drive the input shaft (Item #3) away from the gear (Item #14) direction.

7. Remove Cotter Pin:
-
- Extract the cotter pin (Item #24) from the top of the output shaft (Item #9).
8. Remove Top Nut:
-
- Use a 1 7/16 socket with an extension and a wrench on the opposite side to hold the shaft steady while loosening the top nut (Item #18).

9. Remove Output Gear, Shims, and Bearing:
-
- Remove the output gear (Item #14), shims (Item #13), and bearing (Item #19). Keep them together and label if necessary for reinstallation.

10. Remove Bottom Snap Ring and Protective Shield:
-
- Remove the bottom snap ring (Item #21) and slide the protective shield (Item #23) off the shaft.

11. Remove Bottom Seal:
-
- Use a seal removal tool or a flathead screwdriver to remove the bottom seal (Item #22).
12. Remove Snap Ring Behind Seal:
-
- Remove the snap ring (Item #21) located behind the bottom seal (Item #22).

13. Remove Output Shaft:
-
- Pull out the output shaft (Item #9) from the bottom of the gearbox housing (Item #1).
14. Remove Bearing:
-
- Take off the bearing (Item #20) from the output shaft (Item #9).

Note: Seals should be the last parts installed.
Assembly Instructions
- Install Race and Bearing Set:
-
- Install the race and bearing set (Item #20) in the bottom of the housing. Then, install the output shaft (Item #9) and the snap ring (Item #21).

2. Install Top Bearing Set:
-
- Next, install the top bearing set (Item #19), followed by the shims (Item #13), the top output shaft gear (Item #14), and the castle nut (Item #18).
3. Tighten Castle Nut:
-
- Use a torque wrench to tighten the castle nut (Item #18) to set the bearing pre-load at 8 inch-pounds (rolling torque) without seals. Then, install the cotter pin (Item #24).
4. Install Race on Gear Side:
-
- Install the race (Item #17) on the gear side of the housing, followed by the shims (Item #12) and the snap ring (Item #16).
5. Install Bearing and Gear:
-
- Install the bearing (Item #17), then place the gear (Item #14) on the shaft inside the housing and tap the shaft into place.

6. Install Rear Bearing Set:
-
- Install the rear bearing set (Item #15), followed by the shims (Item #12) and the rear snap ring (Item #16).

7. Check Backlash:
-
- Before installing the seals, check the backlash, which should be between 6-8 thousandths. Add shims as needed to set the correct backlash.
8. Install Bottom Seal and Protective Shield:
-
- Install the bottom seal (Item #22) by pushing it down until there is enough room to install the protective shield (Item #23) and the snap ring (Item #21).

9. Install Rear Cap:
-
- Place the rear cap (Item #5) at the rear of the housing.
10. Install Input Seal:
-
- Install the input seal (Item #4).
11. Prepare and Install Top Plate:
-
- Clean off the old permatex from the top plate (Item #2) and the top of the gearbox housing (Item #1). Apply a fresh coat of permatex to both the top plate and the housing, then replace the top cap using the four bolts (Item #6).
12. Fill with Oil:
-
- Fill the gearbox with oil up to the fill line on the dipstick. The gearbox capacity is three quarts, and the recommended oil is EP80W-90.